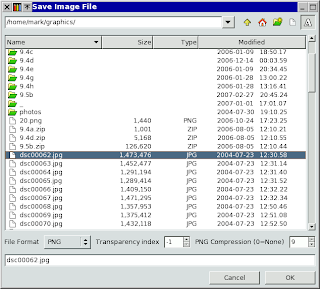
During 2007 and 2008 I designed and implemented a new file picker for mtPaint. Dmitry then refined my efforts to make the picker even better, with the final results now in version 3.30 of mtPaint:
Designing and implementing a new file picker was a big effort but I felt I had no choice due to my increasing frustration with the existing GTK+ file pickers. For a few years I tolerated the Motif style GtkFileSelection, but the time finally came to improve things. I also found that the GtkFileChooser is even worse due to its lack of functionality compared to more orthodox and mainstream file pickers.
The general design of the new mtPaint file picker was deliberately conservative as I was looking to preserve the simplicity and ease of use I have seen in programs like OpenOffice, and most Windows/Qt/KDE systems.
The picker also has the luxury of tab completions and wildcards. If you type "p" into the entry box and press tab, only files beginning with "p" will be displayed. If you type "dsc*.jpg" into the entry box and press tab, the file list will only display files beginning with "dsc" and ending with ".jpg". As you would expect the * wildcard represents any number of characters and the ? wildcard represents exactly one character.
I consider this new design to be far better than the rather feeble GTK+ designs, but some people may prefer the GtkFileSelection dialog, so if that is the case you can re-compile mtPaint with:
./configure gtkfilesel
make
I have also started using this new picker in my other programs such as my 6502 disassembler mt6502dis and my spreadsheet mtCellEdit. As well as my own programs this new picker can be added to any GTK+ program, so I decided to add it to Leafpad: I call this fork mtLeafpad.
Saturday, 22 November 2008
Colour Ramps & Palette Copying
Version 3.30 of mtPaint has some new tools that allow you to easily create smooth horizontal or vertical ramps on the canvas. See section 4.8 of the handbook for details on ramps.
For this example I want to demonstrate how easy it is to use these tools to create a smooth palette based on just 4 primary colours. Lets start by following these steps:
* Create a new RGB image with a size of 16x16.
* Place 4 colours in the corners of a 5x5 square (red, yellow, white and black in this case). This is a screenshot of what this looks like:
* Use the rectangle selection to outline a 5x1 rectangle from the red pixel to the yellow pixel.
* Use the Selection menu to choose the horizontal ramp.
* Repeat these steps for the white and black pixel and you should see this:
* Select the full 5x5 area of the canvas and select the Vertical Ramp option from the Selection menu.
* Lastly choose the "Copy to Palette" option from the Edit menu and you should get these smooth blends in the palette like this:
This is a uniform 2 dimensional palette. Its also possible to create non uniform 1 dimensional palettes. To try this out follow these steps:
* Create a new RGB image at size 25x5.
* Place different coloured points at random positions along a line like this:
* At this point we need to use the rectangle selection and the horizontal ramp as above to fill in each of the gaps. As an aid to productivity I used the menu tear off the feature by clicking the horizontal dashed line at the top of the Selection menu like this:
* Select the whole line and then choose the "Copy to Palette" option from the Edit menu and you should get these smooth blends in the palette like this:
Sunday, 9 November 2008
Uniform Colour Cube Palettes
I have always had an artistic penchant for high contrast small palettes. The best way of generating high contrast palettes with equally spaced colours is to chop up the colour cube in a uniform fashion. The default mtPaint palette does this with the first 8 colours which are the 8 corners of the RGB colour cube.
These 8 colours are formed in the 3 RGB dimensions by 2 divisions (i.e. 2x2x2). However a 256 colour palette is large enough to house several other palettes:
3x3x3 27 colour palette
4x4x4 64 colour palette
5x5x5 125 colour palette
6x6x6 216 colour palette
If you are a C language programmer you might be interested in trying out the program I wrote to generate these palettes and images:
pal3456-0.2.zip source code
I have used my own libmtpixel library to make palette and image creation possible with just a few lines of C code.
Dithering Effect
As explained in section 6.8 of the mtPaint handbook, the "Convert To Indexed" tool in the Image menu is very powerful and allows many types of effect to be created on photos or other RGB images.
Here is a photograph:
I then converted this to 32 colours using a PNN quantize, and the "Dithered (effect)" option:
If you look closely, you can see that the dithering adds its own texture to all of the objects in the image, perhaps similar to fabric or canvas.
To see the above images in all their glory you will need to click them to view them at 100%.
Pointillism & Stippling Effects
Pointillism is a style of painting which can produce some very interesting results by blending just a few primary colours. When creating paintings like this manually it can take an inordinate amount of time as each dot is individually placed. However, mtPaint is able to create these images quickly and easily with a large amount of control over how the colours and dots are chosen.
Here is a photograph:
By using the "Convert To Indexed" tool in the Image menu I created this:
I used 8 colours, Use current palette and Floyd-Steinberg options. I changed the default settings to use Separate/Split error propagation with a propagation value of 90.
To see the above images in all their glory you will need to click them to view them at 100%. As you can see from the results, although only 8 colours have been used, mtPaint has been able to blend the coloured pixels well enough to capture the essence of the original colours.
A related technique is stippling, where only 2 shades are used. This is most commonly done with a black ink pen on a white page. This can be done in mtPaint as you can see from this image:
I achieved this by loading the original JPEG, moving the white palette colour 7 to position 1 (hold the shift key, left click the white colour 7, and drag it to position 1 and then release the left mouse button), and then doing the same steps as above, but having only 2 colours in the final image.
To learn more about the specific options in the "Convert To Indexed" window, see section 6.8 of the mtPaint handbook.
Labels:
Convert To Indexed,
Dithering,
Effects,
Pointillism,
Stippling
Subscribe to:
Posts (Atom)